


This post, together with another one Creating a New MySQL Database in NetBeans IDE, shows how to configure a connection to a MySQL/Maria database from the NetBeans IDE, make a new database and accessing the database in in the IDE’s Database Explorer.
Once the database is connected to the IDE, we can work with MySQL in the IDE’s Database Explorer by performing database operations, such as creating new databases and tables, populating tables, and running SQL queries.
This post covers the first three steps.
The other one, Creating a New MySQL Database in NetBeans IDE, covers the remaining.
1. Starting the MySQL Service on XAMPP Server
Start XAMPP control panel (If you haven’t yet installed XAMPP, visit https://www.apachefriends.org/index.html for installation information.)
On the control panel. Start Apache and MySQL.
2. Configuring MySQL Server Properties
NetBeans IDE supports the MySQL, a relational database management system. Before we can access the MySQL Database Server in NetBeans IDE, configure the MySQL Server properties.
Start NetBeans IDE (If you haven’t installed NetBeans, visit https://netbeans.org/downloads/ for installation information.)
2.1 Basic Properties
Right-click the Databases node in the Services tab and choose Register MySQL Server... to open the MySQL Server Properties dialog box. Enter the MySQL server host name, port number and administrator information as shown in the picture below.
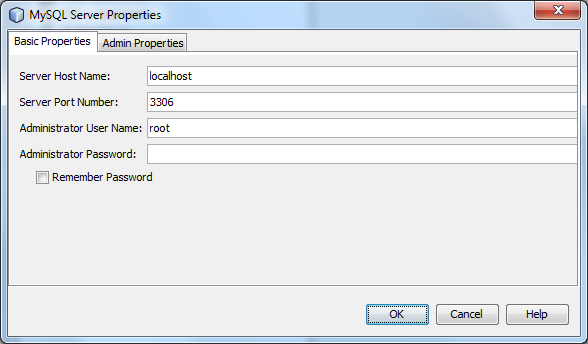
A blank password can also be a password though it should never be used for production version.
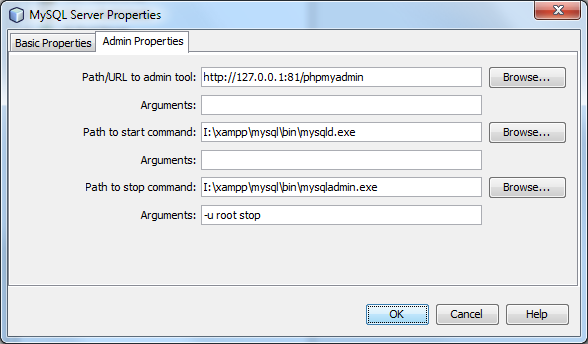
2.2 Admin Properties
Click the Admin Properties tab at the top of the dialog box.
This tab allows us to enter information for controlling the MySQL Server.
In the Path to start command field, type or browse to the location of the MySQL start command. To find the start command, look for mysqld in the bin folder of the XAMPP installation directory.
In the Path to stop command field, type or browse to the location of the MySQL stop command. This is usually the path to `mysqladmin in the mysql/bin folder of the the XAMPP installation directory.
If the command is mysqladmin, in the Arguments field, type -u root stop to grant root permissions for stopping the server.
The following picture shows the content that should be similar except that the drive letter will most likely be different.
If finished press OK button.
If the configuration is correct, in the Services tab window, a new database instance MySQL Server at localhost:3306 [root] should appear as a node under the Databases Explorer node.
3. Connecting the Database Service
Expand the database instance node. The list will show all the databases that are available in the MySQL server.

Be sure that the MySQL Database Server is running. If the instance is disconnected, right click the instance node and choose connect.
4. Next post: Creating a new database
Starting from here, the following steps, creating a new MySQL database, are covered in the post Creating a New MySQL Database in NetBeans IDE.
Share this post
Twitter
Facebook
LinkedIn
Email