


This is an example showing you how to create an application in NetBeans. Before reading this post, you may read the following two:
-
Java Review: application for an introduction of Java application .
-
Packaging Java Application in a JAR for packaging application.
A Java application may consist of one or more classes. A class with the main method can be designated as the Main class.
This example has the following parts.
-
Problem Statement
-
Step 1: Set up a Java Project
MyApp -
Step 2: Create three Packages
-
Step 3: Create a new Java Class
classes.Person -
Step 4: Create a new Java Class
managers.PersonManager -
Step 5: Create a new Java Class
apps.StaffManagement -
Step 6: Configure and Run the Project
-
Step 7: Build a Distribution
-
Step 8. Run the Application
-
Step 9. Share the Distribution
-
Exercise
-
Possible Further Improvements
Problem Statement
This example illustrates a structural design in a prototype. The prototype contains three classes. The class, Person, is designed to meet the following object specifics:
- It possesses the following private property members:
firstName,lastName,gender,email,bDate - It must have a constructor
Person()that initializes lastName, firstName and gender for each new Person instance. - It allows outsiders to read its property members.
Person.setEmail: Person allows outsides to update the email value.Person.toString: Person can custom a string representation by overriding the default Object.toString method.Person.print: Person can print its String representation to the console.
The class, PersonManager, will perform the following functions to manage a collection of Person objects:
- PersonManager has a property
managerName. - PersonManager has a property
staffwhich stores a collection of Person in an ArrayList. - Each new PersonManager instance can be initialized with a managerName value by constructor.
- PersonManager provides interfaces to read its property values.
PersonManager.addPerson: create and add a Person instance into staff.PersonManager.addPeople: add a collection of Person instances into staff.PersonManager.printStaff: print each Person by callingPerson.printmethod.
The class, StaffManagement, is the Main class that will perform the following functions that have been designed for the application prototype:
- Instantiate a new PersonManager with a managerName “staffManager”.
- Call staffManager to add three new Person instances, each with specific firstName, lastName and gender values.
- Call staffManager to print the staff list.
- Update the email value for each staff.
- Call staffManager to print the staff list after email update.
The following instructions are based on NetBeans IDE 8.2 for Windows.
Step 1: Set up a Java Project
- Launch NetBeans.
- Create a new Java project by following the menu path: File -> New Project.
- Then choose Java Application. Click Next.
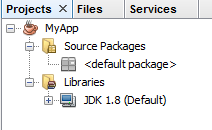
- Enter the name “MyApp”. Specify a different project location if needed. Uncheck the box “Create Main Class”.
- Click Finish.
A new project will open under the Project tab, showing the following project tree.
Step 2: Create three Packages
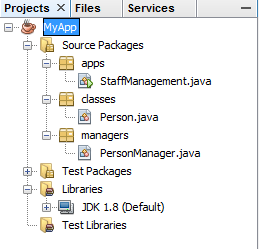
Create three packages named “classes”, “managers” and “apps”.
To create a new package in a project, right click the node “Source Packages” in the project tree. Follow the menu path: New->Java Package. Enter a name for the package. Click Finish.
Up to now, the project tree should look like the picture below, except you won’t have three .java file in each package. In the following parts, these classes will be added into each package.
Step 3: Create a new Java Class classes.Person
Right click the target package “classes”. Follow New -> Java Class. Enter the name “Person”. Click Finish.
An editor tab titled Person.java will immediately open with the default code.
Enter the following source for classes.Person.
 1package classes;
 2
 3public class Person {
 4
 5    private String firstName;
 6    private String lastName;
 7    private String gender;
 8    private String bDate;
 9    private String email;
10
11    public Person(String firstName, String lastName, String gender) {
12        this.firstName = firstName;
13        this.lastName = lastName;
14        this.gender = gender;
15    }
16
17    public void print(){
18        // Print Person in its String format
19        System.out.println(this.toString());
20    }
21
22    @Override
23    public String toString() {
24        // Custom a string representation
25        return "Person{"
26                + "firstName=" + firstName
27                + ", lastName=" + lastName
28                + ", gender=" + gender
29                + ", bDate=" + bDate
30                + ", email=" + email
31                + '}';
32    }
33
34    public String getEmail() {
35        return email;
36    }
37    public void setEmail(String email) {
38        this.email = email;
39    }
40    public String getbDate() {
41        return bDate;
42    }
43
44    public String getGender() {
45        return gender;
46    }
47
48    public String getLastName() {
49        return lastName;
50    }
51
52    public String getFirstName() {
53        return firstName;
54    }
55
56}// End Class
Step 4: Create a new Java Class managers.PersonManager
In the package “managers”, add the Java class PersonManager.
Enter the following source for managers.PersonManager.
(For Java stream function, refer to the post * Processing Collection Data with Java Streams
 1package managers;
 2
 3import classes.Person;
 4import java.util.ArrayList;
 5import java.util.Arrays;
 6
 7public class PersonManager {
 8
 9    private String managerName;
10    private ArrayList<Person> staff;
11
12    public PersonManager(String managerName) {
13        this.managerName = managerName;
14        this.staff = new ArrayList<>();
15    }
16
17    public void addPerson(String firstName, String lastName, String gender) {
18        // Add a new person
19        Person temp = new Person(firstName, lastName, gender);
20        this.staff.add(temp);
21    }
22
23    public void addPeople(String[] fNames, String[] lNames, String[] genders) {
24        // Add a group of people
25        for (String x : fNames) {
26            int pos = Arrays.asList(fNames).indexOf(x);
27            this.addPerson(x, lNames[pos], genders[pos]);
28        }
29    }
30
31    public void printStaff() {
32        // Print all person items in ArrayList staff
33        this.staff
34            .stream()
35            .forEach((person) -> {person.print();});
36    }
37
38    public String getManagerName() {
39        return managerName;
40    }
41
42    public ArrayList<Person> getStaff() {
43        return staff;
44    }
45
46}//End Class
Step 5: Create a new Java Class apps.StaffManagement
In the package “apps”, add the Java class StaffManagement.
Enter the following source for apps.StaffManagementn.
 1package apps;
 2
 3import managers.PersonManager;
 4
 5public class StaffManagement {
 6
 7    public static void main(String[] args) {
 8        // Instantiate a manager
 9        PersonManager staffManager = new PersonManager("Staff");
10        // Operation set 1
11        System.out.println("~~~Initializing three new staff... ");
12        String[] fNames = {"Alpha","Betta","Cita"};
13        String[] lNames = {"Cat","Dog","Pig"};
14        String[] genders = {"f","m","f"};
15        staffManager.addPeople(fNames, lNames, genders);
16        staffManager.printStaff();
17
18        // Operation set 2
19        String[] emails = {"acat@org.com", "bdog@org.com", "cpig@org.com"};
20        staffManager
21                .getStaff()
22                .stream()
23                .forEach(p ->{
24                    int pos = staffManager.getStaff().indexOf(p);
25                    p.setEmail(emails[pos]);
26                });
27        System.out.println("~~~After updating emails: ");
28        staffManager.printStaff();
29    }//End main
30
31}// End staffManagement
Step 6: Configure and Run the Project
Right click the project name in the Projects tab. Follow the menu path: Set Configuration -> Customize….
In the Main Class: field, click Browse… button to select apps.StaffManagement. Click Select Main Class button.
Click OK button to finish configuration.
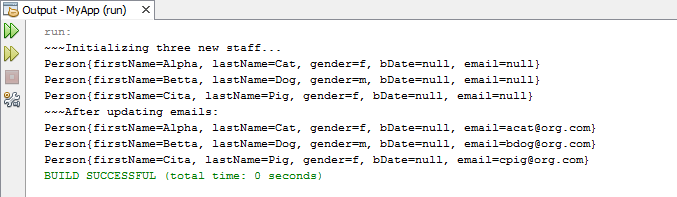
Again right click the project name in the Projects tab. Click Run to run the project.
Step 7: Build a Distribution
In the Projects tab, right click Clean and Build. In the %PROJECT_HOME% folder, a new folder dist will be created for storing at least two files: MyApp.jar and README.TXT.
Step 8: Run the Application
To run the project jar file from the command line, go to the dist folder in the %PROJECT_HOME% directory and type the following:
java -jar "MyApp.jar" Or run the jar file anywhere by providing the full path:
java -jar "%PROJECT_HOME%\dist\MyApp.jar" One possible result you may see in Windows console:
C:\> java -jar G:\Projects\MyApp\dist\MyApp.jar
~~~Initializing three new staff...
Person{firstName=Alpha, lastName=Cat, gender=f, bDate=null, email=null}
Person{firstName=Betta, lastName=Dog, gender=m, bDate=null, email=null}
Person{firstName=Cita, lastName=Pig, gender=f, bDate=null, email=null}
~~~After updating emails:
Person{firstName=Alpha, lastName=Cat, gender=f, bDate=null, email=acat@org.com}
Person{firstName=Betta, lastName=Dog, gender=m, bDate=null, email=bdog@org.com}
Person{firstName=Cita, lastName=Pig, gender=f, bDate=null, email=cpig@org.com}
Step 9: Share the Distribution
Compress the entire dist folder into a file (such as a zip file). Send the compressed file to the target.
Exercise:
Make a new format of printing/reporting each Person instance from PersonManager.staff.
Future Improvements
The class managers.PersonManager can further be augmented to support more functions including, but not limited to:
- PersonManager.sortStaffByName: Sort people by their names
- PersonManager.groupStaffByGender: Partition people into two groups for male and female
- PersonManager.searchStaffByName: Search people for a given name
Hint: Java Streams API. You may read the post Processing Collection Data with Java Streams
Workout
Make a Java application that contains a Main class and the Triangle class. Triangle.java is available in Java Review: Classes, Instances, Properties, Methods.
The Main class has the main method that will take three arguments from the user, create a new Triangle instance and assign the three arguments as integers to three side lengths a, b and c in order. Then the user should be notified by the text in the console, telling the user if his triangle is valid or not.
Note: Each command-line argument in the main method is of type String. In order to take the numerical value from an argument, apply Integer.parseInt to the argument.
For example, to convert (parse) the second argument in args to a numerical value, the expression is
Integer.parseInt(args[1])Submission (in a zip file):
-
Your application in a .jar file
-
The source file of all the classes (Triangle.java and the Main class)
Share this post
Twitter
Facebook
LinkedIn
Email